Bulk Bills
Image D
1. A Microsoft excel file with the following 5 columns are required: Approval Code, Category, Treatment, Dosage/Quantity, and Unit Price. These columns should be well formatted as captured in image D below
2. Click the "Choose File" button, navigate to the path where the excel file containing the bills is stored, then select the file.
3. Select the month and year of the bill. This is equivalent to the bill month and year on the letter of advice sent to HMOs. The platform only supports the upload of bills that have the same month and year.
4. Click the "Upload Now" button to upload and process the excel file
5. View all records of the uploaded files by clicking on this link.
Image D
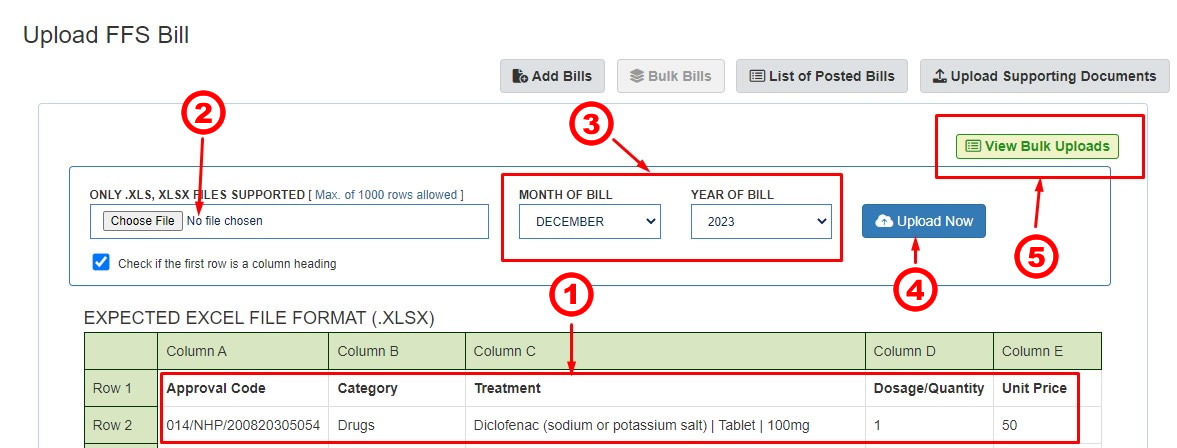
Image E
This page displays after a successful upload of bill records as captured in Image D.
1. Captures the total bills uploaded and cleared by the application to be eligible for further processing.
2. Captures the total bills uploaded but not eligible for further processing until they are modified or deleted.
3. Use this button to delete the entire file records that were uploaded
4. The "Review" button is used to view more details about the uploaded record and how to further update it
Image E

Image F
1. Captures the error message on each line with the "UNCLEARED" status.
2. Captures the clearance status of each record.
3. Captures the post status of each record. Note that bill records can be posted only once and it is only the "CLEARED" bills that can be posted.
4. Use this button to delete the bill records.
5. Captures the post status of each bill record. "YES" mean that the bill was successfully posted.
6. Edit bill record before posting.
7. The "Post Bills" button copies all the "CLEARED" bills to the Posted Bill page as captured in
image B for the publishing of the bills.
Image F
